
How to Write a Tailwind CSS plugin
Learn the basics of building a custom Tailwind CSS plugin for your project.


TailwindCSS has become such a favorite of mine! I have been using Tailwind for most of my projects and I feel productive and at ease while developing beautiful frontend designs. Using their utility and component classes, we can create neat designs for the product. At times there is a challenge when we need to build some custom-styles specific to the product/ there is a missing utility that we need. What do we do at times like this?
In this blog post, we will go through details on how to build a custom Tailwind CSS plugin.
In this blog
Setup Tailwind CSS project
What plugin are we building?
Tailwind CSS plugin
Let's code!
Complete code.
Conclusion
Setup Tailwind CSS project
Let us set up a basic Tailwind CSS project. You can use Tailwind CSS with multiple frameworks like Reactjs, Angular, Laravel, and many others. Check out the official documentation for details on installing tailwind CSS for your favorite project.
For a quick setup, refer to a simple starter project for easy setup and play around with Tailwind in a PostCSS environment. P.S, in this project, I will be using this starter template.
Also, I love to test out styles on TailwindPlay. It sets up a starter tailwind project in your browser.
What plugin are we building?
In this blog, we are building a design for a card. We will have a section for card image and card content. Here we will learn about adding styles to components.
Also, we will build a utility to rotate an element by using the transform property. In this section, we will explore adding utilities and escaping class names.
Tailwind CSS plugin
Plugins are used to extend tailwind capabilities to make them reusable and customizable. Tailwind CSS plugin is a javascript function that will let us register new styles. We will be using the tailwind.config.js file to write our plugin. Below is an example of the basic code of the Tailwind CSS configuration file.

To get started, we must first import Tailwind's plugin function from tailwindcss/plugin. We create an anonymous function to build the card-style design as the first argument in the plugins list in the config file. This function will receive a few helper functions as a parameter, which will be used to develop the card design.
Official documentation of plugins must be looked into to understand the concept in detail. In the plugin we are building, we will be using the below-mentioned helper functions:
theme(), for looking up values in the user’s theme configurationaddComponents(): TheaddComponentsfunction allows you to register new styles to be output at the@tailwind componentsdirective.addUtilities(): Use theaddUtilitiesfunction to register simple static utilities that don’t support user-provided values.e(), for manually escaping strings meant to be used in class names
Let's code!!
First, we will use addComponents() and build custom styles for the card section by writing styles using CSS-in-JS syntax inside the function. Below is the code snippet :
addComponents({
'.card': {
    width: '350px',
    borderRadius: '5px',
    boxShadow: '0px 5px 10px 5px #f2f2f2',
    overflow: 'hidden',
  },
'.card-image': {
    display: 'block',
    width: '100%',
  },
'.card-content': {
    padding:'10px',
    textAlign:'center',
  },
})
Simple right?! Now you have created a plugin for a custom-designed card template. You can just add card , card-image and card-cotent as classes in HTML file for elements.
<div class="card">
   <img class="card-image" src="./welcome.gif" />
   <p class="card-content">Welcome! Let's build a Tailwind CSS plugin</p>
  </div>
Here is the output of the above code :

Awesome!! We have now understood how to add custom styles for components. Further, let us explore addUtilities() and e() helper functions by building a rotate style.
Let us understand what we want our rotate plugin to do
Check out the MDN docs for transform CSS property. Now let us create a plain CSS logic to implement the rotate feature.
.rotate-1\/4 {
  transform: rotate(90deg);
}
.rotate-1\/2 {
  transform: rotate(180deg);
}
.rotate-3\/4 {
  transform: rotate(270deg);
}
In HTML, on a <div> element, the class is applied as below:
<div class="rotate-1/4">Lorem Ipsum....</div>
Now, let us look at how we can create this as a plugin in Tailwind CSS.
To start with, we have to give the default values for the plugin (example: rotate-1/4). To add these, we will make use of theme section of tailwind.config.js file where we can define our project's styles (color, font, etc). Know more about the theme here.
 theme: {
    rotate: {
      '1/4': '90deg',
      '1/2': '180deg',
      '3/4': '270deg',
    }
  },
So now we want to turn these values into an object that the addUtilities function will understand. We will use Object.entries to get entries from object and use .map() functionality to add styles.
const utilities = Object.entries(values).map(([key, value]) => {})
Now, to construct our Tailwind classes we will use another helper function : e() . This function will escape any string that is passed as the parameter. Why are we using this? The class names we have include fractions like 1/4, 1/2, 3/4, etc, here the / causes an issue with class names and thus needs escaping to be applied as 1\/2
Having cleared this, let us now build the utility function completely
const rotateUtilities = Object.entries(values).map(([key, value]) => {
          return {
            [`.${e(`rotate-${key}`)}`]: {
              transform: `rotate(${value})`
            }
          }
        })

addUtilities(rotateUtilities)
With this, we have built a utility to apply rotate styles on elements. On the left we have a template string, first with the dot for a class name, so that it isn’t escaped, then the escape function is called on another template string which includes the key at the end. On the right, we have a CSS-in-JS syntax-based style property.
Complete code
We have completed building the plugin. Let us have a look at the complete tailwind.config.js file.
const plugin = require("tailwindcss/plugin");

module.exports = {
  purge: ["./public/**/*.html"],
  theme: {
    rotate: {
      "1/4": "90deg",
      "1/2": "180deg",
      "3/4": "270deg",
    },
  },
  variants: {},
  plugins: [
    plugin(function ({ addUtilities, addComponents, e, theme }) {
      const values = theme("rotate");
      const rotateUtilities = Object.entries(values).map(([key, value]) => {
        return {
          [`.${e(`rotate-${key}`)}`]: {
            transform: `rotate(${value})`,
          },
        };
      });
      addUtilities(rotateUtilities);

      addComponents({
        ".card": {
          width: "350px",
          borderRadius: "5px",
          boxShadow: "0px 5px 10px 5px #f2f2f2",
          overflow: "hidden",
        },

        ".card-image": {
          display: "block",
          width: "100%",
        },

        ".card-content": {
          padding: "10px",
          textAlign: "center",
        },
      });
    }),
  ],
};
That is the code for Tailwind CSS plugin. I applied the classes from here to simple HTML elements.
<!doctype html>
<html lang="en">
<head>
<meta charset="utf-8">
<meta name="viewport" content="width=device-width, initial-scale=1, shrink-to-fit=no">
<link rel="stylesheet" href="/build/tailwind.css">
<title>Welcome to Tailwind!</title>
</head>
<body class="h-screen flex flex-row justify-items-center items-center w-full">
<p class="p-10 bg-gray-900 rotate-1/4 font-bold text-lg text-gray-100">Tailwind CSS</p>
<div class="card">
<img class="card-image" src="./welcome.gif" />
<p class="card-content">Welcome! Let's build a Tailwind CSS plugin</p>
</div>
<p class="p-10 bg-gray-900 rotate-3/4 text-lg font-bold text-gray-100">Tailwind CSS</p>
</body>
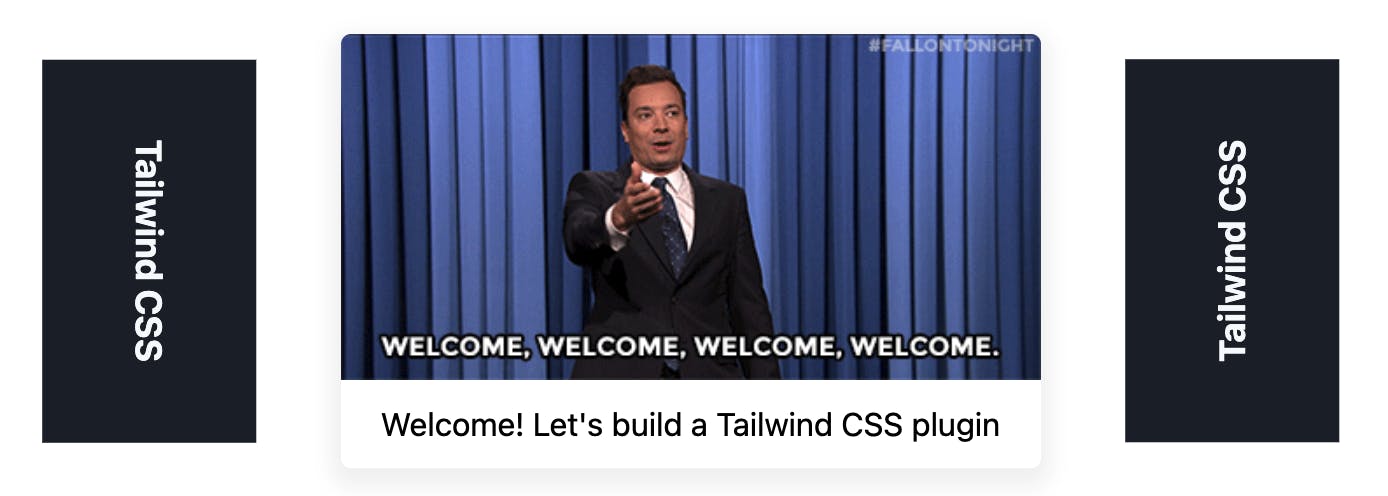
</html>
Here is the output HTML page:
Conclusion
In this tutorial, we went through a simple way of creating a Tailwind plugin. You can create plugins with more variants, components, and classes. I have added two examples of Tailwind plugins, feel free to explore more and add them to your projects to make coding easier.
Hope this was a good read. Let me know your thoughts !! Let us catch up on Twitter